The Perfect Ramen Egg

Ajitama (or ajitsuke tamago) and ramen are a match made in heaven. What’s not to love about gooey, golden egg yolks in a sweet and salty marinade?
After working at a ramen restaurant, hosting gourmet ramen pop-ups, and trying countless recipes, I’ve developed tremendously high standards for my ajitama. In this post, I share all I know.
This post isn’t for those looking for a simple ajitama recipe. It’s for those that want to perfect the craft. We’ll dive deep into what ajitama is, how to make ajitama at home, and how tiny ramen shops manage to peel 200 eggs a day. Be warned!
What’s ajitama?
At it’s most basic, ajitama is a marinated soft-boiled egg. You can change the type of egg (e.g. chicken, quail, or duck) or the marinade (e.g. soy sauce-based, miso-based, or vinegar-based), but the most popular ajitama is simply a chicken egg marinated in soy sauce and mirin.
Stepping back a bit, ajitama is both a means by which to judge a ramen shop’s attention to detail and the bane of a ramen line cook’s existence. They’re also ubiquitous: even 7-Elevens in Japan sell ajitama to quickly enhance packaged ramen!
What MAKES A PERFECT ajitama?
From my perspective, the perfect ajitama has:
A firm white with no dents from peeling or from the egg’s air bubble.
A consistently dark and gooey yolk that is centered in the white from all directions.
A flavorful – slightly sweet – marinade.
The right temperature! iI should be served at least at room temperature.
How are ajitama made?
Ajitama are made by boiling an egg until the egg white hardens, peeling the egg, then marinating the egg until the egg is flavored just right. As you’ll see, that’s easier said than done. And there are SO MANY misconceptions out there online. But here’s how I reliably create eggs with all the ideal characteristics described above.
Selecting the eggs
Almost any eggs will do. In my experience, organic and brown eggs tend to be easier to peel, but the difference is negligible. Unless I am at a Japanese market, I usually grab the cheapest brown eggs in the store. At a Japanese market, I look for eggs from chickens that are bred/raised to produce reddish/golden yolks. They actually feed paprika (and other things) to the chickens to make this happen. Purely aesthetic.
Prepping the eggs
To help with peeling, centering the yolk, and protecting the look of the white, you’re going to want to poke a little hole in each egg. With the eggs facing fatter top up (how they usually arrive in the carton), poke holes in the eggs, then flip the eggs upside down so each hole faces down.
I recommend this egg hole punch (that is conveniently shaped like an egg) to do this easily. I’ve used this one since 2017. Surprisingly, you can probably punch 3 eggs per second once you work up your confidence with this guy.
Boiling the eggs
An ideal ajitama has a firm egg white and a liquid yolk. (Gooey yolks are the result of a proper marinade -- we’ll get to that in a bit.) You’ll see many recipes for achieving the perfect egg yolks -- boiling the eggs for 5:45, steaming them for 9:00, boiling them for 7:00 -- but all those recipes forget about one thing: variability! There are tons of variables that affect how your eggs will turn out, and time is only one of them. The other variables include egg size, egg temperature (pre- and post-boil), water temperature, stove temperature, and the number of eggs you cook at once (which affects the water temperature). Since you can’t perfectly match the conditions of your variables to the conditions of a given recipe, your results with a given recipe will vary.
So you’ve gotta experiment! For my set-up (i.e my stove, my fridge-temp eggs, my volume, etc.), 6:30 is the ideal length of time. I invite you to follow the below steps with a 6:30 boil, but don’t be surprised if you have to change the time you boil next time around. Here are the steps.
Boil water in a really large pot. More water = less temperature change when I add the eggs = less variability.
Add white vinegar to the water, eyeing about 1/15 the volume of the water. Vinegar makes for easy peeling. It both softens the egg shell (did you know you can dissolve an egg shell by storing it in vinegar?) and firms the white (which is also why you add vinegar to the water when making poached eggs).
Once the water and vinegar are at a rolling boil, add the eggs and immediately start a 6:30 timer. I add the eggs in a metal noodle basket so they are easier to remove quickly at the 6:30 mark. Baskets also enable you to cook in batches without reheating the water.
Twice during the cooking process, mix around the eggs a bit. I do it at 4:30 and 2:00 using a long chopstick. This is to ensure that the contents of the eggs are distributed/heated evenly for a centered yolk.
Make a bowl of ice water. This will be the destination for your eggs when the 6:30 is over so that the cooking stops. If you don’t want to use ice, just add a bowl to a sink, fill it with cold water, and (once the eggs are added) occasionally run the cold water to ensure the water isn’t heating up from the warmth of the eggs.
At 6:30, remove the eggs from the boiling water and immediately add them to the ice water bath. Keep the eggs there until they have cooled down completely.
If you’re making a lot of eggs, check how well these eggs cooked before making your second batch. Adjust the time accordingly!
Peeling the eggs
Once the eggs have cooled, it’s time to peel them. This is the bane of every ramen line cook’s existence. Why? It’s difficult to peel an egg quickly without creating dents or breaking the white due to the membrane sticking. I have three secrets for making this easier:
Crack the eggs first. I crack each egg slightly and add it back to the water. This enables the water to “seep” between the shell and the yolk.
Peel the eggs under water (e.g. in a bowl of water or under a running sink). The gentle pressure from the water helps to peel the shell from the yolk.
Only pull back the shell when you have ‘leverage’ on the surrounding shell. So either (1) peel towards you with your pointer and middle fingers while using your thumb for leverage on the opposing side of the shell or (2) peel away from you with your thumb while using your pointer and middle fingers as leverage on the opposing side of the shell.

The people that do this for a living can peel over 3 eggs in a minute. In my most intense two weeks, I improved from 1 per minute to 2.5 per minute when I was in a groove.
Inevitably, some eggs break during the peeling process. Even the pros have a ~3% failure rate. Ramen shops will treat these as snacks or boring additions to staff meal. You can do the same. If your failure rate is too high, just try increasing the boiling time a bit (provided you are satisfied with how the yolk looks afterwards).
Marinating the eggs
The fun part! There are many ways to marinate eggs, but I’m going to focus on the soy sauce-based marinades.
Soy sauce-based marinades contain salt that can cure the yolk. That cure is good when it makes your egg yolk gooey, but it’s bad when it completely hardens the yolk (i.e. wicks too much moisture). Controlling the salt content (or the time the egg is submerged in the marinade) is the key to having the perfect yolk. Here are a few recipes:
Chashu tare recipe: Just cooked pork belly chashu and have all those juices from the pot/sous vide bag? Use them as your ajitama marinade! This is a tasty albeit imprecise method. It’s imprecise because we don’t know the exact salt ratio, so we can’t be sure when the yolk is cured. In most cases, the soy sauce will penetrate the yolk within 8 hours and then cure the yolk beyond the desired amount within a day.
Equilibrium brine recipe: This recipe (from reddit’s u/RamenLord, the English language’s best ramen resource) aims to contain just enough soy sauce such that you don’t have to worry about over-curing the egg. The marinade dilutes the soy sauce in water, so the yolk takes longer to flavor but never over-cures. This method is like the sous vide of marinading -- you’re surrounding the egg in the salt content it should be, so you can’t overdo it. To make an equilibrium brine, follow RamenLord’s recipe.
Equilibrium dashi recipe: This one is my method to enable total experimentation. Reviewing the equilibrium brine recipe above, about 20% of the total liquid volume is soy sauce; the 80% remainder is water and mirin. Rather than flavor that 80% with just water and mirin, this recipe also flavors the 80% with traditional dashi ingredients: kombu, bonito, etc. As such, the recipe is:
Simmer kombu, bonito flakes, sugar, and mirin (or whatever else you’d like to try!)
Strain and cool
Combine the liquid above with soy sauce such that the soy sauce is 20% of the total volume
Once you’ve made the marinade (and you’ve brought it down to fridge temp), submerge the eggs, then cover the eggs with a paper towel. The paper towel soaks up the marinade to ensure that the eggs are fully submerged. If you wanna be super precise and avoid little pockets that lack marinade, rip holes in any air bubbles you see in the paper towel. Then put the eggs in the fridge.
When is the egg done marinating? You’ll need to keep an eye on the eggs for the chashu tare method. For the equilibrium brine methods, the eggs are ready after two days but will totally last a week.
HOW SHOULD AJITAMA BE SERVED?
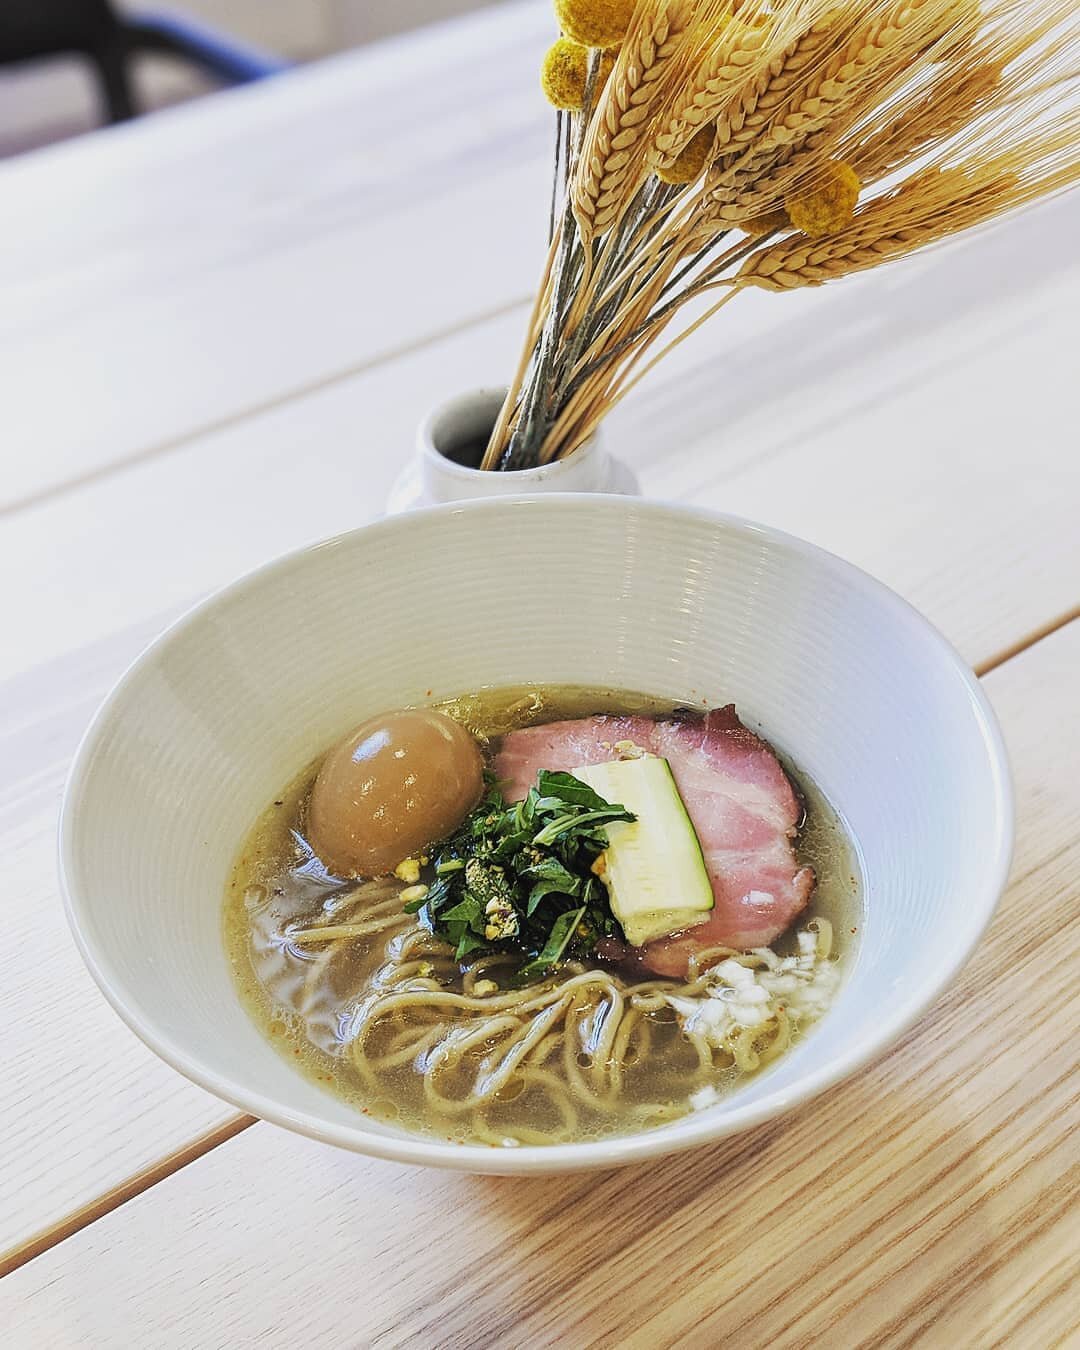
Here are the elements I consider when I am serving my ajitama in a bowl of ramen:
Serve them at room temp! There is nothing worse than a cold egg in a warm bowl of ramen. Yes, you stored the eggs in a fridge, but that’s not an excuse! 45 minutes before serving the eggs, I put the container on the counter for it to heat to room temp. If in a rush, I heat the eggs in their marinade briefly over the stove.
Keepin’ it pretty: Always present the best side of your egg. The eggs that are busted or dented on just one side are fine provided you position the busted side down when plating.
To slice or not to slice? I’m a fan of not slicing my ajitama. First, slicing is a hassle I’d rather not deal with when serving. Stylistically, having a perfect gooey yolk doesn’t really impress me anymore, but having a pristine white still does (probably because I’ve peeled a thousand of them). I also think plating looks more “modern” or balanced without slicing. That said, I know you wanna...
Slicing the egg: Slice with a sharp knife or a taut fishing line. Most shops slice to make ovals, but it is not necessary -- two smaller circles are cool too. Just please don’t plate the eggs such that they look like two eyes on a face!
Why not cook the eggs sous vide?
Eggs are unlike other foods in that there are two separate components that react to cook times/temps in very unique ways. We want the white to be blasted with heat then quickly removed from heat, because that is the best way to firm the white while not firming the yolk. For this reason, the precision of sous vide is not helpful.
The best sous vide soft-boiled egg recipes end up at temps like 98c, which is as close as you can get to boiling anyways. Everything looks like a nail when you have a hammer I guess. At boiling temp, pot over stove is just as accurate as sous vide and easier to set up.
How are ajitama made at scale?
The short answer: there’s no shortcut! Peeling eggs will always be time-consuming.
The way that ramen shops get around this tedium is to treat egg peeling like a “filler” task throughout the day. As you know, eggs are placed in cold water after they are cooked. So long as the water remains cold, you can leave the eggs there and do other work. Have free time while waiting for something else to boil? Peel a few eggs!
Other ways ramen shops reduce the time wasted peeling eggs are either (1) cooking the eggs longer (e.g. 7:00 -- so the white is more firm, which allows you to exhibit less care while peeling) or (2) only serving half eggs. I’m not a fan of either option. For #1, you’ll have a little leeway if you keep your egg unsliced. Most diners won’t notice the little bits of yolk that have overcooked. As for #2, I judge these places pretty hardcore. Sad!
PARTING THOUGHTS
That’s definitely more than I ever thought I’d write about eggs.